KB Article #209
Adding dealers is the first step in the setup process for ProfitNet. This involves two pieces:
- Adding dealers into the OEConnection Manage Suppliers window.
- Attaching CollisionLink dealers to the suppliers you already have set up inside ProfitNet.
Adding Dealers to OEConnection Manage Suppliers
To add dealers:
- From the ProfitNet main window, click on the View/Edit Suppliers
 icon. The ProfitNet Supplier window will display the current list of suppliers.
 - Click the Navigate OEConnection Vendors
 icon. Your Internet browser will launch and go to your CollisionLinkShop.com account.
- Click the Dealers tab and click Add Dealer. (Click here for detailed information on adding dealers in CollisionLink Shop.)
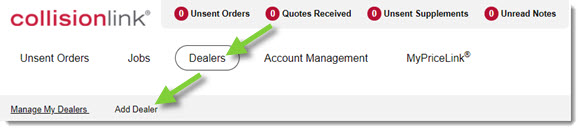
- The selected dealer(s) will be added to your dealers list in CollisionLink Shop.
- Click the Dealers tab and click Add Dealer. (Click here for detailed information on adding dealers in CollisionLink Shop.)
- Repeat the step above to add additional dealers. Note: The Preferred option in CollisionLink Shop does not work within ProfitNet.
- When finished, minimize or close your Internet browser to return to ProfitNet.
- From ProfitNet's Supplier window, select the Import OEConnection Vendor
 icon.
icon. - The OEConnection Vendor Lookup window will display. To add the suppliers:

- Click the Refresh icon to import the dealers you added in CollisionLink Shop.
- Check the boxes to the left of each dealer that you want to add in ProfitNet.
- Click OK.
Next, you will need to attach the chosen dealers to the ProfitNet supplier in the shop system.
Attaching Suppliers in ProfitNet
To attach suppliers in ProfitNet:
- From the ProfitNet Supplier window, locate the desired supplier.
- Either double-click on the supplier, or click once to highlight it and then click the Information tab.
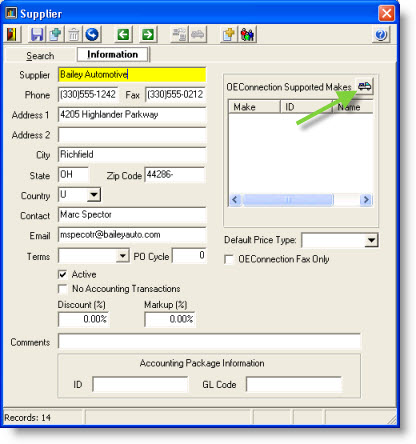
- On the Information tab, click the OEConnection Vendor Lookup button beside OEConnection Supported Makes. This will open the OEConnection Vendor Lookup window.
- To pull over all the suppliers that you added on the CollisionLink Manage My Dealers window, click the Refresh Vendor List icon. This will refresh the OEConnection Vendor Lookup window and all the suppliers should now be listed.
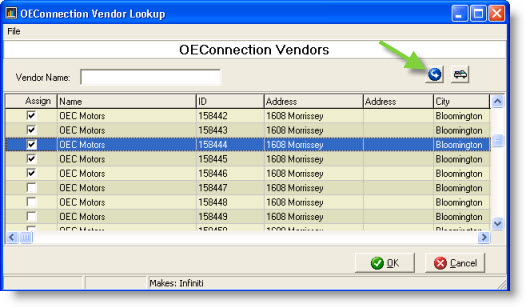
- Look through the list and find the supplier you are trying to set up. Check the box to the left of the supplier's name. (You can check off multiple boxes if the dealer supports multiple OEMs.) Once you check off a supplier, their make (or OEM) will be listed at the bottom of the box.
- When finished, click OK. The OEConnection Vendor Lookup window will close and the different makes should now be listed in the OEConnection Supported Makes box.
- Click the floppy disc icon (
 ) to save.
 - Repeat these steps until all suppliers have been attached to OEConnection dealers.
- Click the X in the upper right-hand corner of the Supplier window to close.